|
|
| Zeile 211: |
Zeile 211: |
| Ideal für VAT-Animationen wie Flaggen oder Simulationen. | | Ideal für VAT-Animationen wie Flaggen oder Simulationen. |
|
| |
|
| <div style="max-height:400px; overflow:auto; border:1px solid #ccc; padding:10px;"> | | <details> |
| | <summary>PingPong Looper Script anzeigen</summary> |
|
| |
|
| <syntaxhighlight lang="python"> | | <syntaxhighlight lang="python"> |
| bl_info = {
| | # dein Code |
| "name": "VAT PingPong Looper",
| |
| "author": "ChatGPT und Pierre",
| |
| "version": (1, 0, 0),
| |
| "blender": (5, 0, 0),
| |
| "location": "View3D > Sidebar > VAT Loop",
| |
| "description": "Creates eased ping-pong Shape Key animation from simulated mesh frames for OpenVAT",
| |
| "category": "Animation",
| |
| }
| |
| | |
| import bpy
| |
| | |
| | |
| def smoothstep(t):
| |
| return t * t * (3.0 - 2.0 * t)
| |
| | |
| | |
| def iter_action_fcurves(action):
| |
| if action is None:
| |
| return []
| |
| | |
| if hasattr(action, "fcurves"):
| |
| return action.fcurves
| |
| | |
| fcurves = []
| |
| | |
| if hasattr(action, "layers"):
| |
| for layer in action.layers:
| |
| for strip in layer.strips:
| |
| if hasattr(strip, "channelbags"):
| |
| for channelbag in strip.channelbags:
| |
| if hasattr(channelbag, "fcurves"):
| |
| fcurves.extend(channelbag.fcurves)
| |
| | |
| return fcurves
| |
| | |
| | |
| def build_eased_pingpong_frames(start, end, ease_frames=12, hold_frames=0):
| |
| frames = []
| |
| | |
| normal_end = max(start, end - ease_frames)
| |
| | |
| frames.extend(range(start, normal_end + 1))
| |
| | |
| for i in range(1, ease_frames + 1):
| |
| t = i / ease_frames
| |
| eased = smoothstep(t)
| |
| frame = normal_end + eased * (end - normal_end)
| |
| frames.append(round(frame))
| |
| | |
| frames.extend([end] * hold_frames)
| |
| | |
| for i in range(1, ease_frames + 1):
| |
| t = i / ease_frames
| |
| eased = smoothstep(t)
| |
| frame = end - eased * (end - normal_end)
| |
| frames.append(round(frame))
| |
| | |
| backward_start = normal_end - 1
| |
| frames.extend(range(backward_start, start, -1))
| |
| | |
| cleaned = []
| |
| | |
| for f in frames:
| |
| if not cleaned or f != cleaned[-1]:
| |
| cleaned.append(f)
| |
| elif f == end:
| |
| cleaned.append(f)
| |
| | |
| return cleaned
| |
| | |
| | |
| class VATLoopSettings(bpy.types.PropertyGroup):
| |
| source_start: bpy.props.IntProperty(
| |
| name="Start Frame",
| |
| default=1,
| |
| min=1
| |
| )
| |
| | |
| source_end: bpy.props.IntProperty(
| |
| name="End Frame",
| |
| default=200,
| |
| min=2
| |
| )
| |
| | |
| ease_frames: bpy.props.IntProperty(
| |
| name="Ease Frames",
| |
| default=5,
| |
| min=0
| |
| )
| |
| | |
| hold_frames: bpy.props.IntProperty(
| |
| name="Hold Frames",
| |
| default=0,
| |
| min=0
| |
| )
| |
| | |
| output_start: bpy.props.IntProperty(
| |
| name="Output Start",
| |
| default=1,
| |
| min=1
| |
| )
| |
| | |
| keep_source: bpy.props.BoolProperty(
| |
| name="Hide Source Object",
| |
| default=True
| |
| )
| |
| | |
| object_name: bpy.props.StringProperty(
| |
| name="New Object Name",
| |
| default="VAT_PingPong_Loop"
| |
| )
| |
| | |
| | |
| class VATLOOP_OT_loop_me(bpy.types.Operator):
| |
| bl_idname = "vatloop.loop_me"
| |
| bl_label = "Loop me"
| |
| bl_description = "Create eased ping-pong Shape Key animation from selected mesh"
| |
| bl_options = {"REGISTER", "UNDO"}
| |
| | |
| def execute(self, context):
| |
| settings = context.scene.vat_loop_settings
| |
| src = context.active_object
| |
| | |
| if src is None or src.type != "MESH":
| |
| self.report({"ERROR"}, "Bitte zuerst ein Mesh-Objekt auswählen.")
| |
| return {"CANCELLED"}
| |
| | |
| if settings.source_end <= settings.source_start:
| |
| self.report({"ERROR"}, "End Frame muss größer als Start Frame sein.")
| |
| return {"CANCELLED"}
| |
| | |
| scene = context.scene
| |
| depsgraph = context.evaluated_depsgraph_get()
| |
| | |
| frames = build_eased_pingpong_frames(
| |
| settings.source_start,
| |
| settings.source_end,
| |
| settings.ease_frames,
| |
| settings.hold_frames
| |
| )
| |
| | |
| scene.frame_set(frames[0])
| |
| context.view_layer.update()
| |
| | |
| src_eval = src.evaluated_get(depsgraph)
| |
| base_mesh = bpy.data.meshes.new_from_object(src_eval, depsgraph=depsgraph)
| |
| | |
| new_obj = bpy.data.objects.new(settings.object_name, base_mesh)
| |
| context.collection.objects.link(new_obj)
| |
| | |
| bpy.ops.object.select_all(action="DESELECT")
| |
| context.view_layer.objects.active = new_obj
| |
| new_obj.select_set(True)
| |
| | |
| new_obj.shape_key_add(name="Basis")
| |
| | |
| shape_keys = []
| |
| | |
| for i, src_frame in enumerate(frames):
| |
| scene.frame_set(src_frame)
| |
| context.view_layer.update()
| |
| | |
| src_eval = src.evaluated_get(depsgraph)
| |
| temp_mesh = bpy.data.meshes.new_from_object(src_eval, depsgraph=depsgraph)
| |
| | |
| if len(temp_mesh.vertices) != len(base_mesh.vertices):
| |
| bpy.data.meshes.remove(temp_mesh)
| |
| self.report({"ERROR"}, f"Vertex-Anzahl hat sich bei Frame {src_frame} geändert.")
| |
| return {"CANCELLED"}
| |
| | |
| key = new_obj.shape_key_add(
| |
| name=f"Frame_{i + settings.output_start:04d}_Src_{src_frame:04d}"
| |
| )
| |
| | |
| for v_idx, vert in enumerate(temp_mesh.vertices):
| |
| key.data[v_idx].co = vert.co
| |
| | |
| key.value = 0.0
| |
| shape_keys.append(key)
| |
| | |
| bpy.data.meshes.remove(temp_mesh)
| |
| | |
| for i, key in enumerate(shape_keys):
| |
| out_frame = settings.output_start + i
| |
| | |
| key.value = 0.0
| |
| key.keyframe_insert("value", frame=out_frame - 1)
| |
| | |
| key.value = 1.0
| |
| key.keyframe_insert("value", frame=out_frame)
| |
| | |
| key.value = 0.0
| |
| key.keyframe_insert("value", frame=out_frame + 1)
| |
| | |
| if new_obj.data.shape_keys and new_obj.data.shape_keys.animation_data:
| |
| action = new_obj.data.shape_keys.animation_data.action
| |
| for fc in iter_action_fcurves(action):
| |
| for kp in fc.keyframe_points:
| |
| kp.interpolation = "CONSTANT"
| |
| | |
| scene.frame_start = settings.output_start
| |
| scene.frame_end = settings.output_start + len(frames) - 1
| |
| scene.frame_set(scene.frame_start)
| |
| | |
| if settings.keep_source:
| |
| src.hide_viewport = True
| |
| src.hide_render = True
| |
| | |
| self.report(
| |
| {"INFO"},
| |
| f"Loop erstellt: {new_obj.name}, Frames {scene.frame_start}-{scene.frame_end}"
| |
| )
| |
| | |
| return {"FINISHED"}
| |
| | |
| | |
| class VATLOOP_PT_panel(bpy.types.Panel):
| |
| bl_label = "VAT PingPong Looper"
| |
| bl_idname = "VATLOOP_PT_panel"
| |
| bl_space_type = "VIEW_3D"
| |
| bl_region_type = "UI"
| |
| bl_category = "VAT Loop"
| |
| | |
| def draw(self, context):
| |
| layout = self.layout
| |
| settings = context.scene.vat_loop_settings
| |
| | |
| layout.label(text="Source Frames")
| |
| layout.prop(settings, "source_start")
| |
| layout.prop(settings, "source_end")
| |
| | |
| layout.separator()
| |
| | |
| layout.label(text="Loop Smoothing")
| |
| layout.prop(settings, "ease_frames")
| |
| layout.prop(settings, "hold_frames")
| |
| | |
| layout.separator()
| |
| | |
| layout.label(text="Output")
| |
| layout.prop(settings, "output_start")
| |
| layout.prop(settings, "object_name")
| |
| layout.prop(settings, "keep_source")
| |
| | |
| layout.separator()
| |
| | |
| layout.operator("vatloop.loop_me", icon="MOD_CLOTH")
| |
| | |
| | |
| classes = (
| |
| VATLoopSettings,
| |
| VATLOOP_OT_loop_me,
| |
| VATLOOP_PT_panel,
| |
| )
| |
| | |
| | |
| def register():
| |
| for cls in classes:
| |
| bpy.utils.register_class(cls)
| |
| | |
| bpy.types.Scene.vat_loop_settings = bpy.props.PointerProperty(type=VATLoopSettings)
| |
| | |
| | |
| def unregister():
| |
| del bpy.types.Scene.vat_loop_settings
| |
| | |
| for cls in reversed(classes):
| |
| bpy.utils.unregister_class(cls)
| |
| | |
| | |
| if __name__ == "__main__":
| |
| register()
| |
| </syntaxhighlight> | | </syntaxhighlight> |
|
| |
|
| </div> | | </details> |
|
| |
|
| == Fazit == | | == Fazit == |
OpenVAT in VRChat (Unity Built-in)
Einleitung
OpenVAT (Vertex Animation Textures) ist eine Technik, bei der Animationen nicht über Bones, sondern über Texturen abgespielt werden. Dabei werden Vertex-Positionen in einer EXR-Datei gespeichert und im Shader wieder ausgelesen.
Das ist besonders interessant für VR, da:
Animationen komplett auf der GPU laufen
keine komplexen Rigs benötigt werden
Simulationen wie Stoff oder Flaggen sehr performant dargestellt werden können
1. OpenVAT in Blender verwenden
Installation von OpenVAT
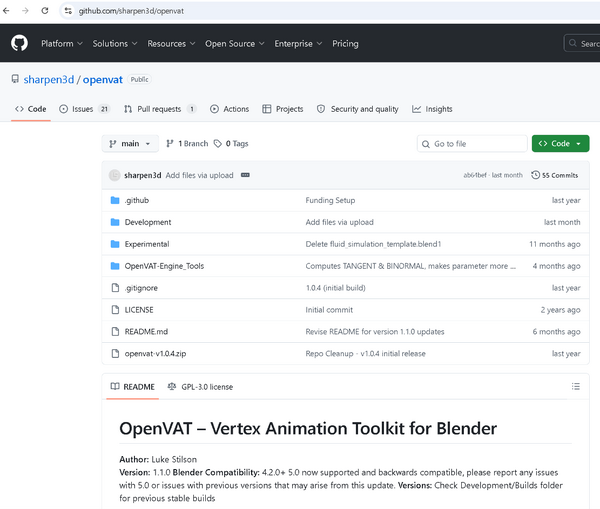
Bevor Vertex Animation Textures erstellt werden können, muss zunächst das kostenlose Blender-Add-on OpenVAT installiert werden. OpenVAT wird aktiv weiterentwickelt und ist offiziell für Blender 4.2 oder neuer verfügbar.
Download
OpenVAT kann auf zwei Arten installiert werden:
Blender Extensions (empfohlen)
GitHub-Projekt
Installation über Blender Extensions
Blender starten.
Edit → Preferences öffnen.
Zum Bereich Get Extensions wechseln.
Nach OpenVAT suchen.
Auf Install klicken.
Alternativ kann das Add-on auch über die Blender Extensions Webseite heruntergeladen und anschließend über Edit → Preferences → Add-ons → Install... als ZIP-Datei installiert werden.
Jetzt eine Animation erstellen (z. B. Cloth Simulation)
2. OpenVAT auf das Objekt anwenden
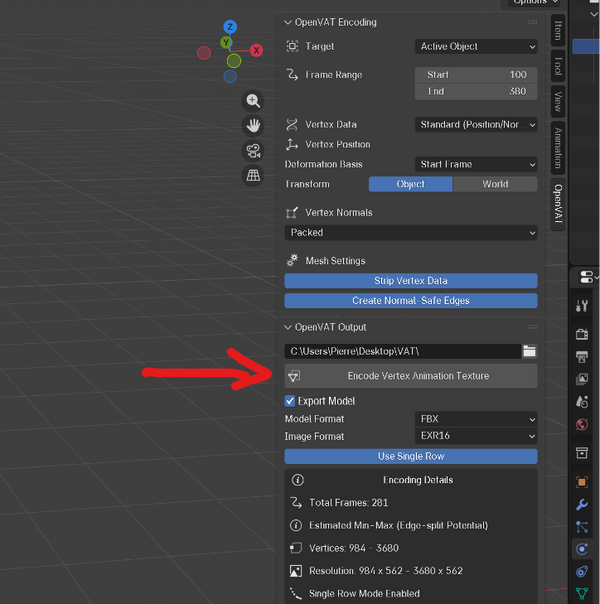
Wichtige Einstellungen:
Frame Range – Animationsbereich
Vertex Data: Standard (Position/Normal)
Deformation Basis: Start Frame → wichtig für Offset-Animation
Transform: Object
Use Single Row → optimiert Texture Layout
Dann auf Encode Vertex Animation Texture klicken.
3. Shader Graph VRC installieren
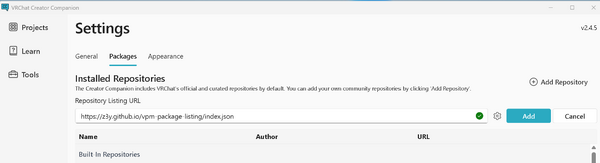
Im VRChat Creator Companion:
Repository hinzufügen:
https://z3y.github.io/vpm-package-listing/index.json
Danach:
Paket Shader Graph VRC installieren
im Projekt aktivieren
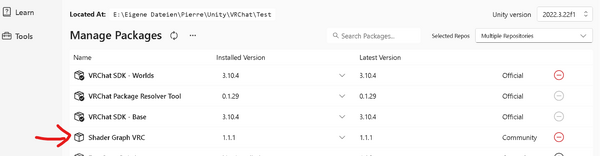
Warum:
→ Standard ShaderGraph ist nicht VRChat-kompatibel
→ Dieses Paket macht Built-in Shader nutzbar
4. Shader Graph in Unity installieren
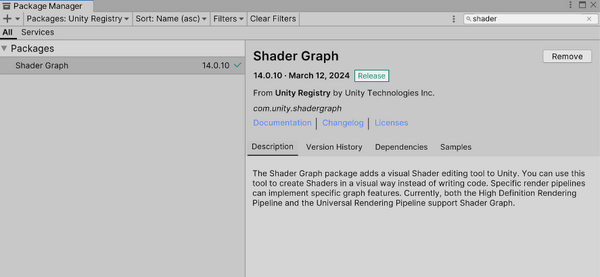
Im Unity Package Manager:
Shader Graph installieren
5. OpenVAT Plugin installieren
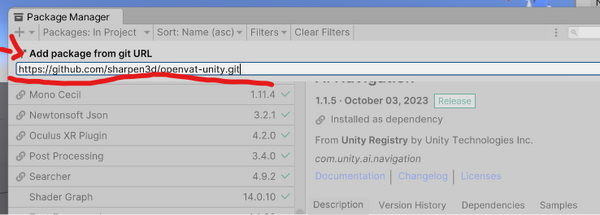
Im Package Manager:
Add package from Git URL
https://github.com/sharpen3d/openvat-unity.git
6. Export aus Blender importieren
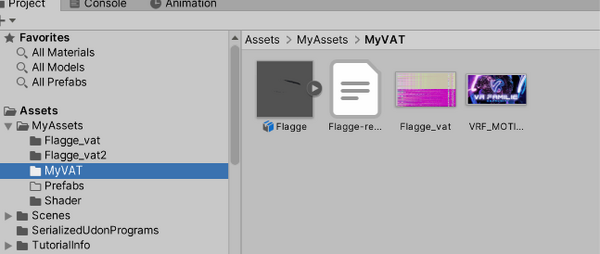
Alle Dateien in Unity kopieren:
FBX (Mesh)
EXR (Animation)
JSON (optional)
Empfohlen:
→ eigenes Verzeichnis erstellen
7. EXR Texture korrekt einstellen
Die EXR ist keine normale Textur, sondern enthält Vertex-Daten!
Wichtige Einstellungen:
Non Power of 2 = None
Compression = None
MipMaps = Off
Wrap Mode = Clamp
Filter Mode = Point (oder Bilinear für smoothing)
Sehr wichtig:
Für jede Plattform separat einstellen:
Windows
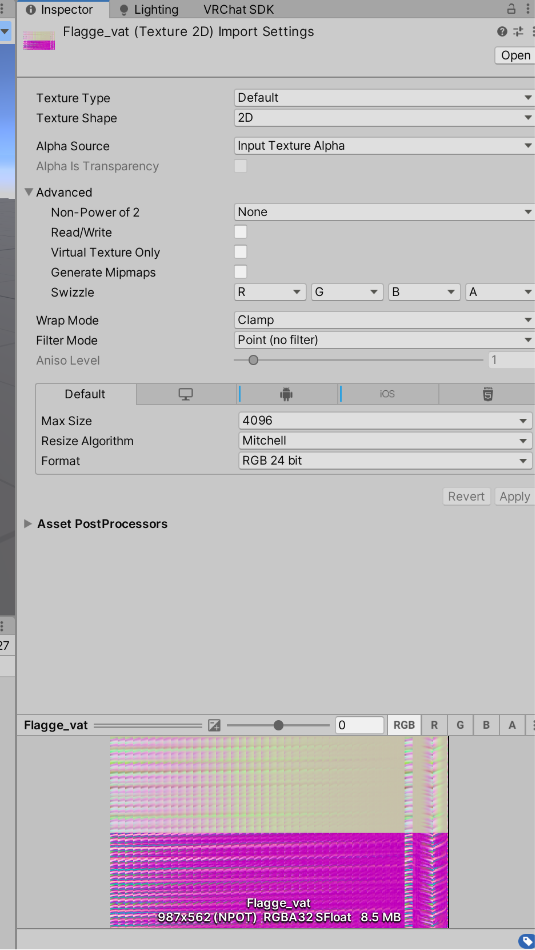
Android (Quest!)
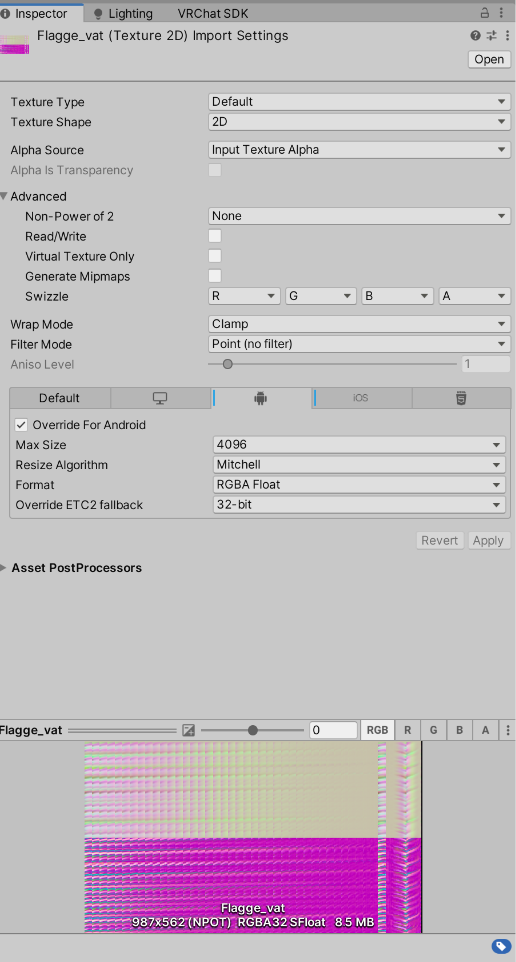
iOS
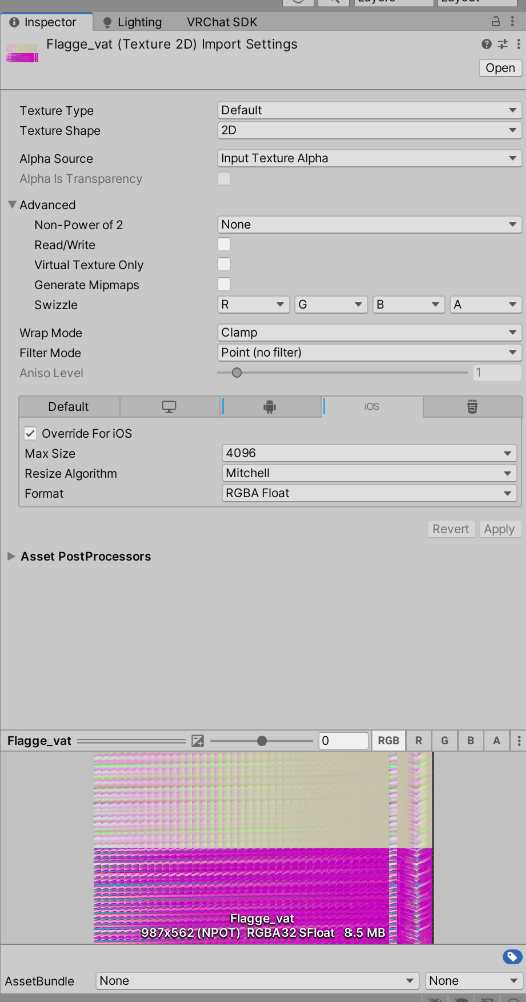
→ Unity nutzt Plattform-Overrides
→ falsche Settings zerstören die Animation oder Qualität
8. Shader auf VRChat Built-in umstellen
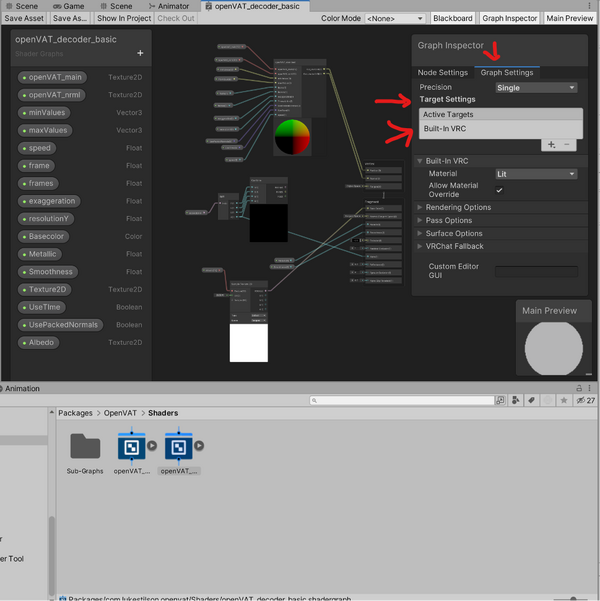
Im ShaderGraph:
Graph Inspector öffnen
Active Targets → Built-In VRC
Warum:
VRChat nutzt die Built-in Pipeline
→ URP funktioniert nicht
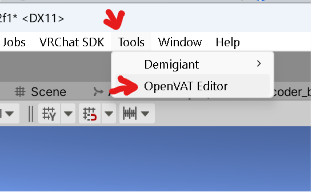
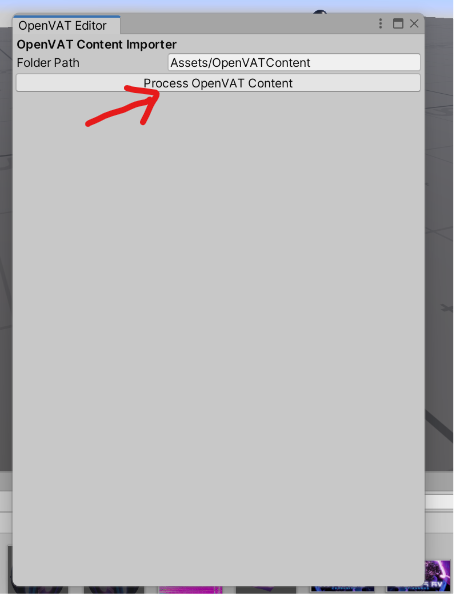
Im Menü:
Tools → OpenVAT Editor
Dann:
Export-Ordner auswählen
Process OpenVAT Content klicken
10. Ergebnis
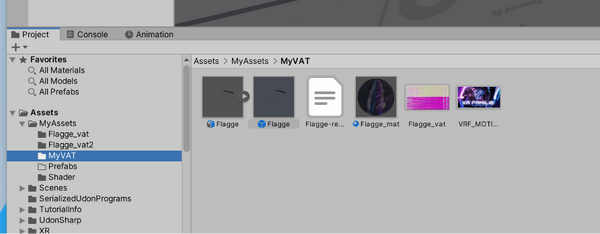
Unity erzeugt automatisch:
Material
Prefab
aufbereitetes Mesh
11. Albedo und Emission hinzufügen
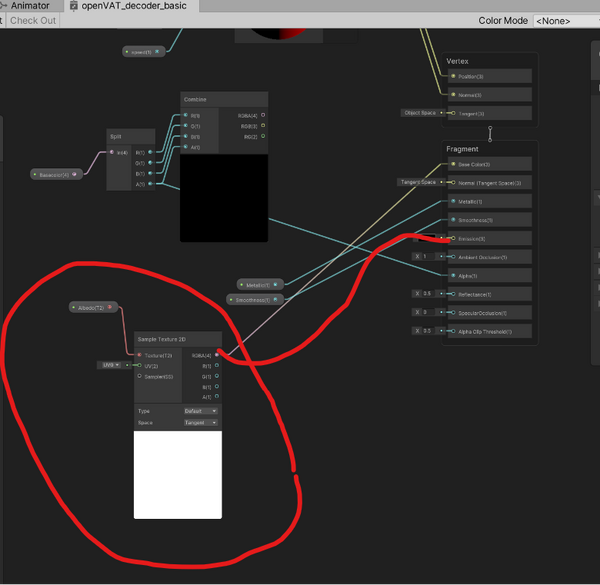
Im ShaderGraph ergänzen:
Texture2D Property erstellen (Albedo)
Sample Texture 2D Node
UV0 anschließen
Output → Base Color
Optional Emission:
Texture → Multiply (z. B. Stärke 1–3)
Output → Emission
12. Textur im Material setzen
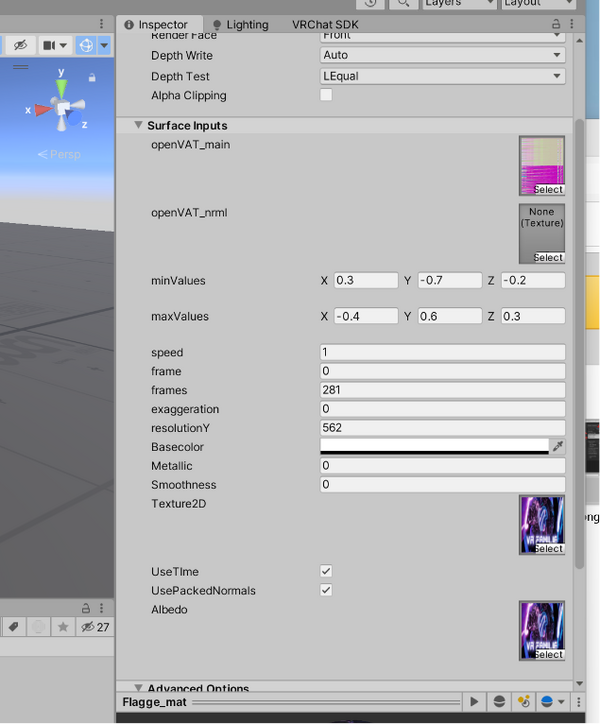
Im Material:
Albedo Textur zuweisen
13. Prefab testen
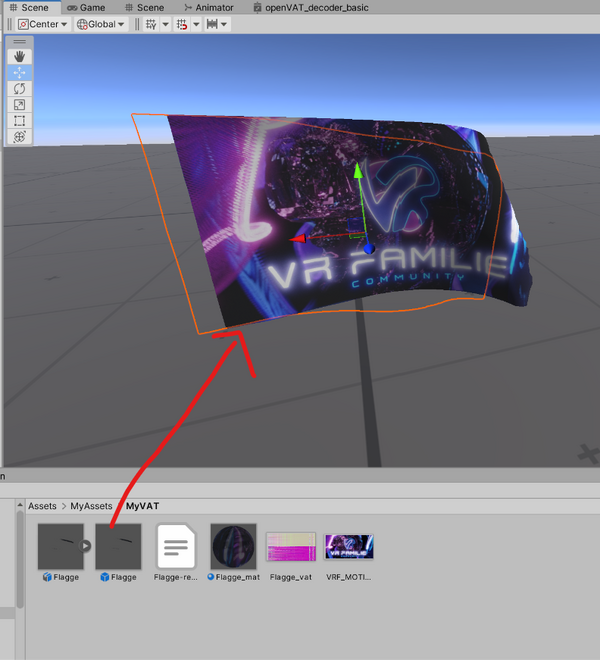
Prefab in die Szene ziehen:
Animation sollte direkt laufen
Funktion testen
Download Blender Addon
Dieses Add-on dupliziert die Animation, kehrt sie um und hängt sie an.
Dadurch entsteht ein nahtloser Loop ohne sichtbaren Übergang.
Ideal für VAT-Animationen wie Flaggen oder Simulationen.
<details>
<summary>PingPong Looper Script anzeigen</summary>
<syntaxhighlight lang="python">
- dein Code
</syntaxhighlight>
</details>
Fazit
OpenVAT ermöglicht:
GPU-basierte Animationen
komplexe Simulationen ohne Bones
sehr gute Performance in VR
Wichtige Learnings:
EXR darf nicht verändert werden
Plattform-Overrides sind entscheidend (Quest!)
Shader muss VRChat-kompatibel sein
Damit lassen sich hochwertige Animationen direkt in VRChat einsetzen.


